
Connect GoHighLevel to SEOryon
Paste a Private Integration token and a Location ID, pick the blog and author, and approved articles publish to that sub-account's blog. Read the create-only note below before you connect: GoHighLevel does not let anything edit a post after it is published.
- How it connects
- Private Integration token (pit-) plus a Location ID
- Edit after publishing
- No, posts are final once published
- Delete and unpublish
- No, only inside GoHighLevel itself
- Tables
- Yes, published as real tables
Before you connect
Get these in place first. They are the difference between a connection that goes green and one that fails on the first publish.
Do not skip this one
A blog in the sub-account with at least one published post, and at least one blog author created. Publishing stays paused until an author exists.
- A Private Integration token with the seven blog scopes listed in step 5.
- The Location ID of the sub-account you are publishing for. Agency and sub-account tokens both work, and the token is per location.
How to connect, step by step
The same steps SEOryon walks you through in the app, with the screens you will actually see.
- 1
In GoHighLevel, open Settings, then Business Profile, and copy the Location ID at the top of General Information.
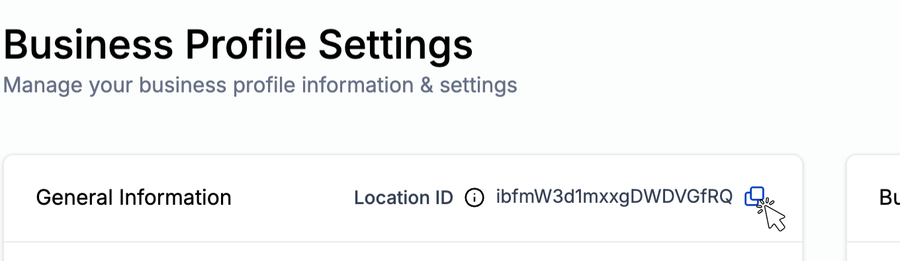
Business Profile: copy the Location ID. - 2
In the settings sidebar, open Private Integrations.
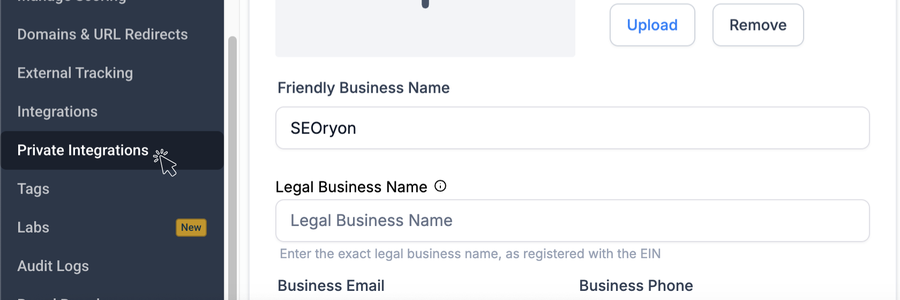
Settings sidebar: Private Integrations. - 3
Click Create new integration.
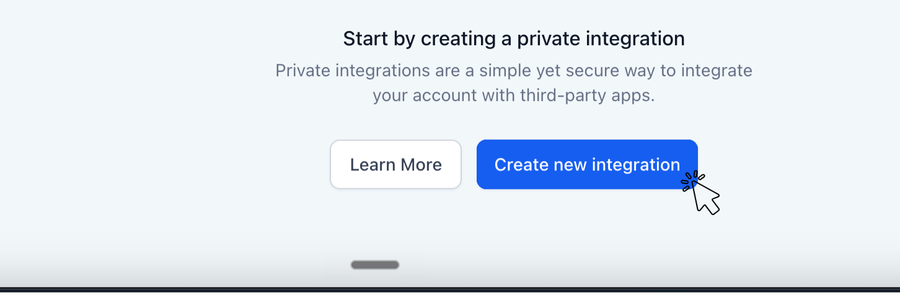
Create new integration. - 4
On the Basic info tab, give it a name, for example SEOryon, then click Next.
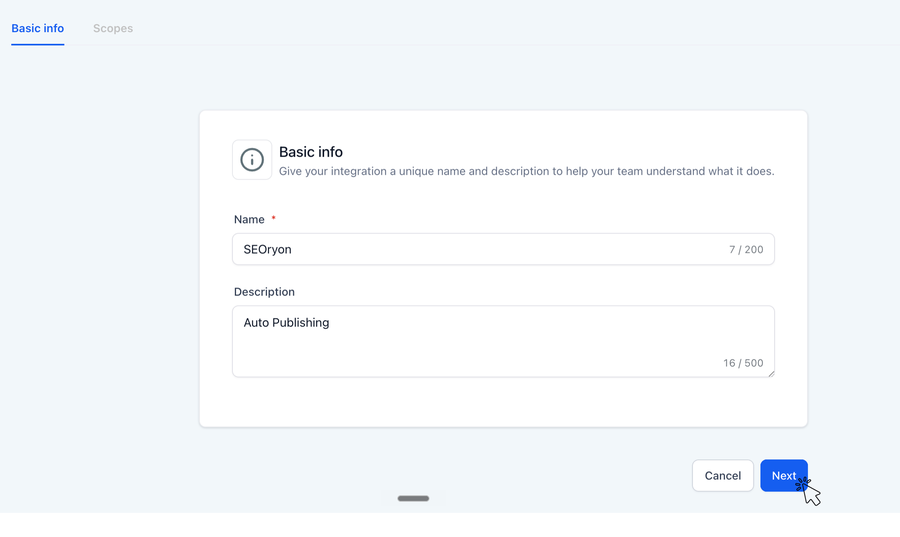
Basic info: name it, then Next. - 5
On the Scopes tab, add all seven blog scopes by their exact GoHighLevel names: View Blog List, View Blog Posts, View Blog Authors, View Blog Categories, Create Blog Post, Update Blog Post, and Check Blog Post Slug. Then click Create.
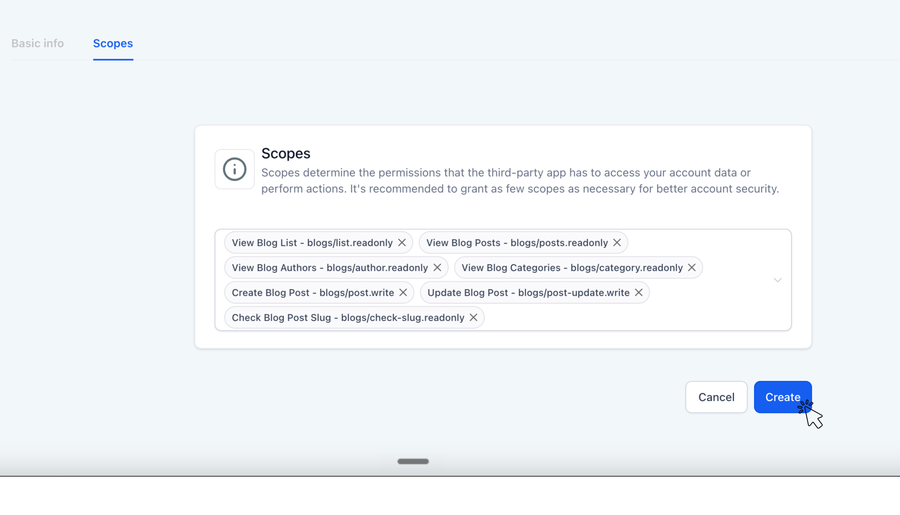
Scopes: add all seven blog scopes. - 6
In the token dialog, click Copy (GoHighLevel shows the pit- token once) and paste it into SEOryon with the Location ID.
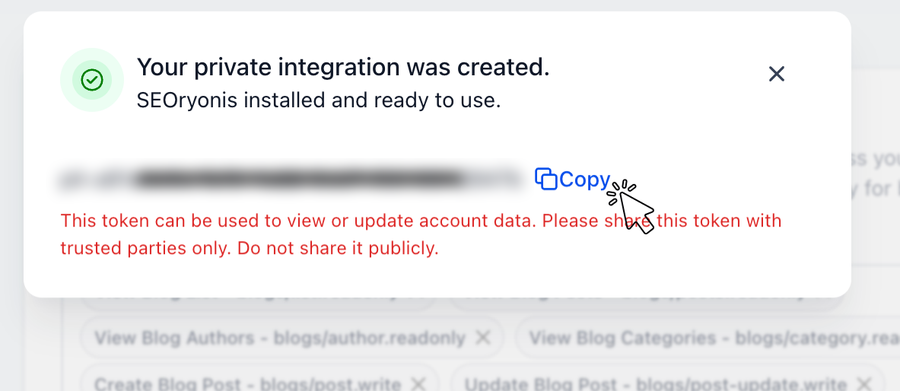
Copy the pit- token, then paste it into SEOryon.
What happens when you click Connect
Connecting runs a real test publish. SEOryon creates a draft, verifies it, deletes it, and only then marks the connection healthy, so a connected badge means publishing genuinely works.
What you can do once GoHighLevel is connected
- Create and publish a new post to the blog you choose.
- Publish to the right sub-account, since the token is per location.
- Featured image by URL.
- Tables publish as real tables.
What to know about GoHighLevel
The honest part. Every platform has edges, and you should hear about them from us before you hit them.
GoHighLevel is create-only. Once SEOryon publishes a post, it cannot edit, delete, or unpublish it through the API. GoHighLevel's Blogs API makes published posts immutable, so this is a platform limitation, not a gap in SEOryon.
Edits you make in SEOryon after publishing will not sync to GoHighLevel. Change the post inside GoHighLevel itself.
SEOryon discloses this at connect time and guards against creating duplicate posts.
Comparison tables publish as real tables on GoHighLevel. See the full table support matrix.
What publishing looks like
Approved articles publish to the right location's blog, with the author and status you chose, and stay exactly as published.
SEO on GoHighLevel
Best practices that move the needle
Built for multi-location and agency work. The basics still apply, with a few quirks to manage across sub-accounts.
- Set a unique SEO title and meta description per blog post and per location page, never relying on the site default.
- Keep URL slugs short, readable, and aligned with the page's primary topic.
- Use one H1 per page and let H2s map the sections of the post or service.
- Compress and add descriptive alt text to every image before uploading.
- Link location pages to your blog posts and back, so topical authority compounds across sub-accounts.
 Base44
 Lovable
See it on your own site, free.
Start a 3-day free trial and generate 3 real articles on your own site before you decide. Cancel before day 3 and you pay nothing.
- Done-for-you articles, monthly
- Built on your real search data
- Publishes straight to your CMS
- Built for Google and AI search
- 3-day free trial, cancel anytime